
NotifyMesh - The Notification Service LLD
Part 3 - The Notification Service LLD · Building NotifyMesh · Week 3

If you haven't read the previous parts yet, I'd recommend starting there - this post builds directly on top of them.
Part 1 laid the foundation. Before writing a single line of code, I mapped out the high level design - how the system is split into four deployable units, how each service talks to the others, what each component is responsible for, and why certain architectural decisions were made the way they were. Things like why Kafka over RabbitMQ, why EventBridge over an in-process scheduler, and why workers never retry themselves. Getting the HLD right first meant every decision that followed had a clear reason behind it.
Part 2 went deep into the data layer. Two databases power NotifyMesh - RDS PostgreSQL for the Notification DB and DynamoDB for the Template DB. That post covered all five tables of the Notification DB, the state machine that drives the notification lifecycle, the indexing strategy, and why certain tradeoffs were made - optimistic locking over SELECT FOR UPDATE, partial covering indexes over full indexes, and why DynamoDB was the right fit for templates but the wrong fit for notifications.
Part 3 is where the design gets concrete. This post covers the Low Level Design of the Notification Service - every class, every relationship, every design decision before a single line of code is written. LLD is not just boxes and arrows. It is where you answer the hard questions - how validation is structured, how the service layer is organized, how infrastructure concerns like Kafka, S3, and ElastiCache are abstracted, and how errors propagate through the system. Getting this right on paper means the implementation phase is about execution, not discovery.
The project structure
NotifyMesh is made up of four deployable units - the Notification Service, the Worker Service, the Template Service, and the Scheduler and Retry Lambda. Each unit has a single responsibility and scales independently.
This post focuses entirely on the Notification Service - the entry point of the system. Every notification request that comes into NotifyMesh lands here first. It receives the request, validates it, persists it, and hands it off to the Worker Service via Kafka. Everything after that - delivery, retries, audit logging - happens outside this service.
Keeping the Notification Service and Worker Service as separate deployable units was a deliberate decision. If both lived in the same service, their scaling concerns would collide. The Notification Service scales with incoming request volume - it spikes when many services are sending notifications at once. The Worker Service scales with delivery workload - it spikes when a large batch needs processing or when retries pile up because a third party API is having issues. Running them together means a Worker side spike steals resources from the Notification Service and new requests start failing. Separating them means each Auto Scaling Group responds to its own load independently.
The Kafka bridge between them reinforces this separation. The Notification Service auto scales when incoming request volume spikes - for example when multiple internal services trigger a large batch of notifications simultaneously. The Worker Service auto scales when Kafka consumer lag grows - meaning the number of unprocessed messages in the topic increases. This happens when delivery workload is heavy, like when 10,000 scheduled notifications all become due at the same time, or when a third party provider like Slack is slow and messages are backing up. Each side scales for exactly the right reason, completely independent of the other.
The Notification Service is organized into five layers:
- Input layer - receives incoming requests and delegates to the validator and service. Currently REST based but designed to accommodate other input protocols like Kafka consumers in the future
- Validator layer - handles conditional validation that Bean Validation annotations cannot express. Simple constraints like
@NotNulland@NotBlankare handled directly on the request class. The validator only steps in for logic like ensuringscheduledAtis present whendeliveryTypeis SCHEDULED, or thatsubjectis only provided for EMAIL channel. It is intentionally stateless - no DB or external calls, just the request itself - and fails fast if anything is wrong - Service layer - owns all the business logic and orchestrates the flow after validation passes. This includes checking business rules that require external context - like verifying
externalIduniqueness, confirming thetemplateNameexists via cache or the Template Service, and validating that attachment S3 keys are accessible. Once those checks pass it fetches theChannelTypeandPriorityfrom the DB, builds theNotificationentity, saves it along with any attachments, and hands off to the appropriate infrastructure class -KafkaPublisherfor direct notifications orSchedulerServicefor scheduled ones - Repository layer - handles all database interactions with RDS PostgreSQL. Each repository is a Spring Data JPA interface that extends
JpaRepository- standard methods likesave,findById, anddeleteByIdcome for free. Custom queries are only added when the default methods are not enough - likefindByExternalIdonNotificationRepositorywhich returns aNotificationSummaryprojection instead of the full entity to avoid fetching unnecessary columns - Infrastructure layer - abstractions over external systems.
KafkaPublisherwrapsKafkaTemplateand handles publishingnotificationIdto the Kafka topic.SchedulerServicewraps the AWS EventBridge SDK and handles creating and deleting one-time schedules.S3Servicewraps the AWS S3 SDK and handles file uploads.CacheServicewrapsRedisTemplateand handles caching S3 keys and template names against ElastiCache.ElastiCacheConfigis a Spring configuration class that sets up theRedisTemplatebean
Each layer has a single responsibility. Nothing bleeds into another layer.
The class diagram
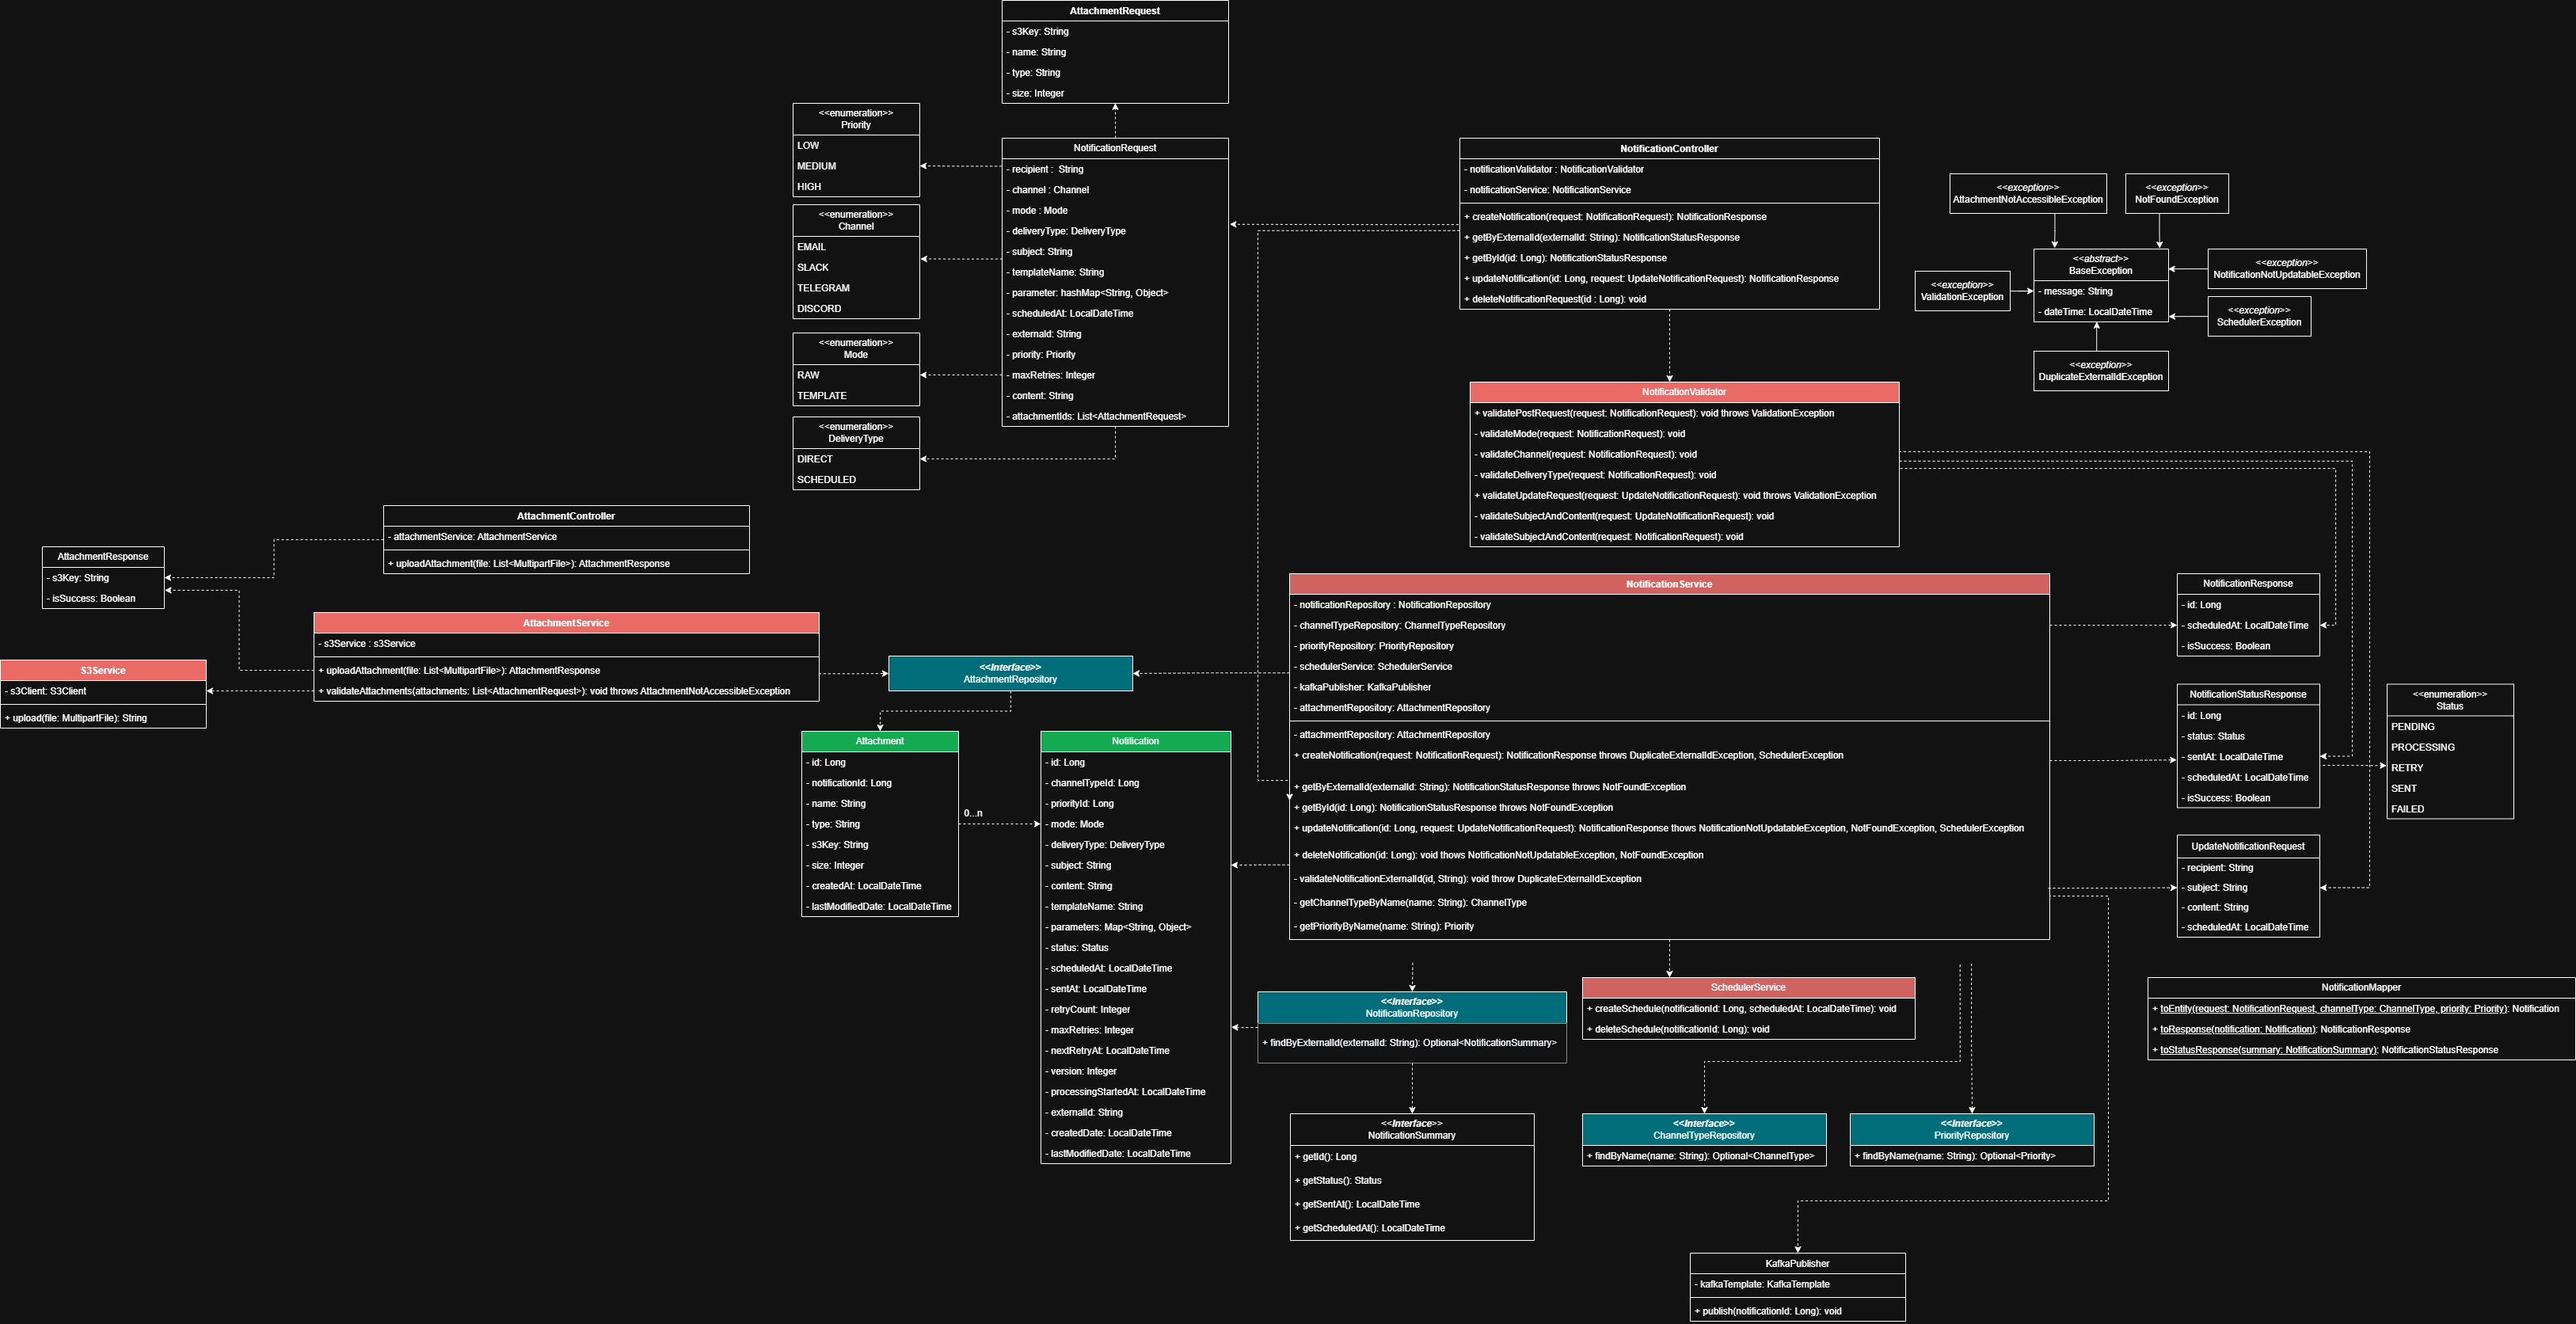
The diagram above covers the full Notification Service - every class, every relationship, every dependency. The color coding separates the layers visually - the input and validator layer, the service layer, the entity and repository layer, and the infrastructure layer. The exception hierarchy sits on the right. Every design decision made in this post is reflected somewhere in this diagram. Take a minute to look through it before reading on - the rest of this post explains the why behind what you see here.
Design decisions and tradeoffs
Validation is a two layer concern
The first instinct when building a validation layer is to put everything in one place. One class, one method, everything checked before the request proceeds. Clean on the surface but it breaks down fast.
Some validations only need the request itself - if deliveryType is DIRECT then scheduledAt must be null. If mode is TEMPLATE then subject must be null. These checks require no database calls, no external API calls, nothing outside the request. They are fast, stateless, and should fail immediately before any resource is touched.
Other validations require context that only exists outside the request - does this templateName actually exist in DynamoDB? Is this externalId already taken? Are these S3 keys accessible in our bucket? These require cache lookups or database calls. Mixing them with structural validation means every request pays the cost of external calls even when the request is obviously malformed.
So the split is deliberate. NotificationValidator handles everything that can be decided from the request alone - stateless, no dependencies, fails fast. NotificationService handles everything that needs external context - after the request has already passed structural validation. By the time the service runs, the request is guaranteed to be structurally sound.
The controller orchestrates both. It calls the validator first, and if that passes it calls the service. This keeps each class focused on one responsibility - the validator never touches the DB, the service never does structural checks, and the controller never contains logic of its own.
All attachments must live in NotifyMesh's own S3 bucket
The obvious approach for attachments is to let the caller pass any S3 URL they want. They upload the file wherever they want and just hand NotifyMesh a link. Simple for the caller, less work for NotifyMesh.
The problem shows up with scheduled notifications. A notification scheduled 20 days from now has its attachment stored in the caller's own S3 bucket. 10 days later the caller's lifecycle policy expires that file. When the Worker Service tries to fetch the attachment at delivery time it gets a 403 or 404 and the delivery fails. NotifyMesh has no control over when that file disappears because it does not own the bucket.
The fix is simple - NotifyMesh owns the bucket, NotifyMesh controls the lifecycle. The caller uploads the file through the AttachmentController which stores it in the dynamic-attachments S3 bucket. NotifyMesh's IAM role has full access to that bucket. The Worker Service can always fetch the file at delivery time regardless of when the notification is scheduled.
This also closes a security concern. If external S3 URLs were accepted, a caller could pass any S3 key pointing to anything. By enforcing uploads through AttachmentController every file in the bucket was put there intentionally through NotifyMesh's own upload flow.
Why attachment upload is a separate API call
The first instinct is to combine everything into one request - send the file and the notification details together, let NotifyMesh handle the upload and creation in one shot. Simpler for the caller on the surface.
The problem is what happens inside that single request. NotifyMesh receives the file, uploads it to S3, saves the notification, publishes to Kafka - all in one transaction. If the file is large the notification creation becomes slow. If S3 upload fails the whole request fails. The caller is blocked waiting for the file upload to complete before getting any response.
More importantly - what if the caller wants to send the same attachment to 1000 notifications? With the combined approach they upload the same file 1000 times. With the separate approach they upload once, get the s3Key, and reference it in all 1000 notification requests.
Separating them gives cleaner error handling, faster notification creation, and reusable attachments. The file upload concern and the notification creation concern are independent - they should be treated that way.
Caching S3 keys and template names in ElastiCache
Every notification creation request that includes attachments needs to verify that the S3 keys are accessible. Every TEMPLATE mode request needs to verify that the template actually exists. The straightforward approach is to make a direct call - hit the S3 headObject API for each attachment, hit the Template Service for each template name. Correct but expensive on every single request.
Both of these are naturally cache friendly. An S3 key does not change after upload - if it was there when the file was uploaded it will be there when the notification is created. A template name does not disappear between the time a template is created and the time a notification references it. These are stable references, not volatile data.
So when a file is uploaded through AttachmentController, the returned s3Key is immediately cached in ElastiCache. When a template is created in the Template Service, the templateName is cached. When a notification request comes in, CacheService checks the cache first. If the key or template name is found the validation passes instantly - no S3 API call, no HTTP call to the Template Service. If it is not found in cache, the system falls back to the direct call and repopulates the cache on success.
The TTL on the cache matches the S3 lifecycle policy. If files expire after 30 days the cache entry expires after 30 days too. They stay in sync without any manual intervention.
NotificationMapper is a static utility class
Mapping between request objects, entities, and response objects is pure transformation - no state, no dependencies, no side effects. A class with no state and no dependencies does not need to be instantiated or injected. Making it static keeps it honest - it is a utility, not a service. Calling NotificationMapper.toEntity(request, channelType, priority) directly is cleaner than injecting a mapper bean everywhere just to call one method.
Orphan S3 files are a V2 concern
When a caller uploads a file through AttachmentController and gets back an s3Key, there is a window where the file exists in S3 but no notification references it yet. If the caller fails before creating the notification - network error, application crash, anything - the file sits in the bucket indefinitely with nothing pointing to it.
The production solution is a cleanup job that periodically scans for S3 objects with no corresponding attachment record in the DB and deletes them. In V2 this will be handled by an S3 lifecycle policy combined with a scheduled Lambda.
For V1 the tradeoff is acceptable. Orphan files are a storage cost concern, not a correctness concern. They do not affect delivery, they do not affect data integrity, and they do not affect any other part of the system. The cost of a few unclaimed files in S3 is negligible compared to the complexity of building and maintaining a cleanup mechanism upfront.
What's next
The Notification Service is the entry point - it receives, validates, persists, and hands off. The interesting part of NotifyMesh happens after the handoff.
Part 4 covers the Worker Service and Template Service LLD. The Worker Service is where the actual delivery happens - consuming from Kafka, dispatching to the right channel handler, handling failures, writing audit logs, and updating the notification status. The retry mechanism, the channel dispatching pattern, and the sequence diagrams showing the full async delivery flow - all of that comes next.
Follow along on Hashnode · Connect on LinkedIn · Code on GitHub


